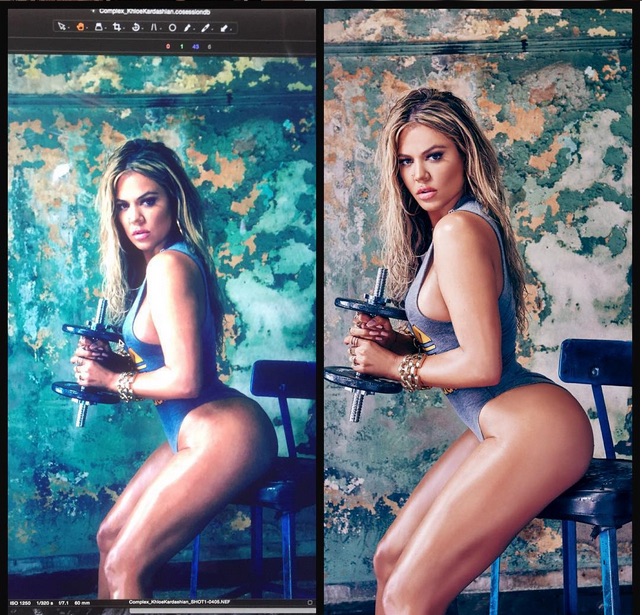
This week, Khloe Kardashian (I’m her biggest fan, by the way) fought back against the swarms of angry people calling her out for retouching her recent Complex cover shoot. In the side-by-side photos, you can see how the shadows and lighting have been lightly edited.
Key word: lightly.
That’s the secret to a good retouching job – making sure that the subject’s main features aren’t distorted or too edited but still enhancing the focus of the image and cleaning up any unwanted blemishes or distractions.
I’m the first to admit that I’m a huge fan of retouching. I believe, if someone’s going to spend good money on a photo shoot, that they should receive the best possible images. And I understand why there were so many people upset over the use of retouching – it portrays an image of perfection to girls and women viewing the images and may set unrealistic standards. But the fact of the matter is this – Khloe is a brand in and of herself. She is selling herself and her fitness, and if the photographer sees fit to lightly retouch her images, then I see no problem with that.
I use the same techniques in my photos. My niche is executive portraits and commercial photos, and that’s the goal of my shoots – to “sell” an executive or a professional and help them further their business.But I always make sure to highlight their features instead of changing them all together. Now, this hasn’t always been the case. I’ve definitely made mistakes retouching images and gone “overboard,” but after years of experience and perfecting my craft, I’ve learned how to do it right.
So, go ahead Khloe! You look amazing, retouched or not.
I’m the first to admit that I’ve made a lot of mistakes over my career. Everything from bringing the wrong equipment to a shoot to a poor retouching job on the images or even arriving late to a set, the list goes on. But I learned more from those experiences than from a book or from the advice anyone could have given me.
I feel the same way about all the different roles I’ve had in the photography industry. From shooting fashion to catalogs to events, I’ve gotten the chance to see how the business works in so many different facets. But what I found over many years of experience was where I fit: executive portraits.
Here’s how I found my focus in the industry:
Try everything you can: It took me many years and many jobs to find the role I’m in now. I dove into different types of photography and learned from amazing professionals that came before me. I was open to new experiences, even if they didn’t always work out. To be honest, I would have never thought I would love shooting executive portraits. But I do – it’s a way to help people further their image and their career. It helps create a people create a new image for their career. And had I not dipped my toes into many waters, I may not have found my way here.
Ask questions: There will always be someone who has more experience than you. Find those people and pick their brain. Listen to what they say. Ask them as many questions as you can. There are no such thing as “bad” questions. Only unanswered ones.
SEO: The best thing that I’ve invested in, besides my own equipment, was search engine optimization. It made me more accessible to potential clients and broadened my reach to the market. SEO can be an expensive endeavor, but it will pay for itself in no time.
Professional networking events: Events held by BNI or other networking groups allowed me to meet other professionals and become better known in the market. It allowed me to reach more people and develop personal connections with clients.
With the explosion in social media and equipment affordability, everyone is becoming a photographer. Everyone, their mom, and in some cases even their dog (see @remythadon) have Instagrams. Everyone can purchase their own DSLR at affordable prices and in convenient locations. But what makes a photographer is the craft – the lighting, the scenery, the angles and composition. It’s the details that make a photo extraordinary.
After working with so many incredible photographers that have come before me, I was lucky enough to learn the tricks of the trade. Now it’s my turn to return the favor. Below are some quick tips for taking better photographs:
Background:
Backgrounds sound like simple details to photographers, but the perfect background is simple. Keep it basic, that way you don’t distract from your subject. Simple backdrops or solid colors seem to work best. It draws the eye directly to the person or subject you’re shooting.
Also, be aware of your peripherals. Did you want to catch that garbage or messy closet in the background? Didn’t think so. Be sure to scan your area for any unwanted background clutter.
Flash:
Knowing when and how to use a flash is pivotal. Using a flash too close or too far away distorts the photo’s crisp details and may either be too light or too dark to see the subject. Make sure you’re no further than 5 feet away when using a flash.
Lighting:
Lighting is everything. Lighting captures the details that make your photo. The right light can make an ordinary picture amazing. Be aware of your subject’s details and be aware of the time of day or equipment you’re using. Some people prefer using SoftBoxes or Beauty Dishes, so know how far and how high to position them according to your subject’s placement. Use reflectors if needed to make that dark spot pop. Use your angles!
Framing:
Using framing as a photograph technique is great and always makes subjects pop. Framing a subject by drawing attention to the subject can be done with different, out-of-focus elements or by blurring the background to lead the viewer’s eye directly to the subject. Be sure to play with the variables of the photo so you can decide whether it works in your photo or not.
Hold the camera steady:
Simple, yet very important. A common mistake for photographers is a shaky hand or leaning too much when trying to capture the photo and losing a steady grip. Hold your camera firmly. Take your photo confidently. And, make sure your feet are firmly planted on the ground. No one likes a fallen photographer.
Take your time:
Three words that mean everything to a photog: cool, calm, confident. Believe in what you’re shooting and your abilities. It’s your photo and your work of art. You’re in control. Take as much time as you need to create your masterpiece.
Everyone has a preference, a specific idea of what they like and don’t like. While that may be just fine when ordering your dinner at a restaurant where you can pick and choose what goes on your salad, it works a little differently when taking head shots. After years of experience in the photography world, I’ve learned there are some very simple rules to getting the right shot that get overlooked on a regular basis by my clients. Here are your “do’s” and “don’ts” to the perfect headshot:
DO:
Hire a hair and make-up artist:
Time and time again, clients will come in for a shoot and do all their primping on their own. While they may look great in the mirror, what shows up on camera can be much different. That’s why I highly recommend hiring a professional who knows exactly how to style you for the lens.
Arrive clean-shaven and showered:
I know, this sounds like an obvious one but it’s surprising how many times this isn’t taken into consideration. Every feature, every hair and every detail is enhanced on camera. Always arrive to the shoot freshly shaven and ready to knock ‘em dead.
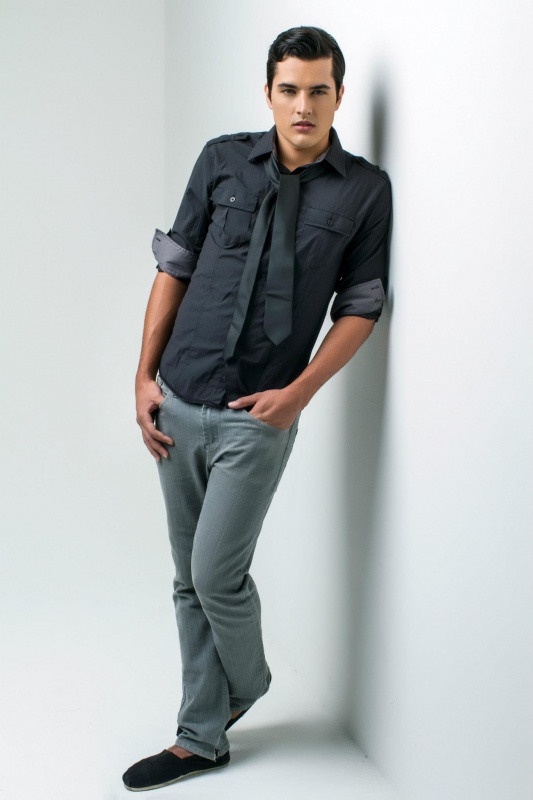
Bring wardrobe options – more is better:
Clothing options are key to a good executive shoot. I recommend bringing lots of choices, especially collared fitted shirts. For men, polo shirts are great for a casual look and button-downs photograph well for an executive. Women photograph well in fitted button-down shirts or dresses. But make sure you bring clothing options you feel confident wearing!
Get enough sleep before your session:
A commonly overlooked detail is how rested you are on the day of your shoot. The camera catches everything, including how well rested you are. Even if your skin is flawless, little wrinkles show up when you haven’t gotten enough beauty sleep. So, get some solid shut-eye before your shoot and you’ll photograph like a star.
RELAX!
Like I was saying, the camera catches everything. It even picks up on your mood, no matter how hard you’re smiling. Rest assured that if you feel cool, calm and collected, your photos will reflect that. And for anything else, don’t worry – I can retouch.
DON’T:
Be in a hurry:
Shooting executives and busy professionals can be stressful. They’re either planning a meeting or running out the door to an appointment. I suggest to plan accordingly for your shoot. An appointment with me usually takes up to an hour, and I guarantee you’ll shoot leaps and bounds better if you’re present than if you’re already one foot out the door.
Show up hungover:
Being fresh-faced and rested is pivotal to your photos. I’m sure that if you had a few too many the night before, you won’t be excited to pose for an hour the next day. Be sure to get some good rest, stay hydrated and cut back before your session. You’ll be pleasantly surprised.
Don’t drink during the shoot:
While having a drink to loosen you up on the set of a shoot might sound like a great idea, it doesn’t turn out too well. The camera picks up even the slightest redness in a person’s eyes and the flushing of their skin. It’s best to stick with water instead of a glass of red.
Over-do it: less is more:
Going back to the tip above about hiring a hair and make-up artist: less is more. When they’re getting you ready for your shoot, they’ll know exactly how much to do and when to stop. This rule is especially true for your clothing. It’s best to stick with simple, basic options so the attention is drawn to your face rather than the print on your clothes. Think basic, think plain. Let your features be the focal point.
Run the show:
Let the photographer lead you during the shoot. Many times, clients will try to position themselves like they would for a picture on Instagram, but those poses don’t translate into a headshot or executive portrait. Take direction and have fun! It’s just a picture, after all.
End note: Don’t settle on your choice of photographer. Give me a call and make an appointment today.
One of the most common questions I get as a photographer is how to make the leap from acting as a hobby to as a profession. When it comes to a child wanting to be on TV or Film…the task can be a challenge. In the entertainment business, getting signed by an agent to represent them is key. Agents receive the casting “breakdowns”, then submit their represented talent to the casting directors, and bring forth auditions. In the broadcast or commercial print industry, especially for children, success is based mostly on personality and physical appearance.
1. If your child shows interest in acting, sign them up for a class. This is the first step to see if they really want to do this, or if the desire will fade once things become more structured.
2. A professional headshot is an actor’s calling card. If your child is 10 or older, he or she needs one. This shows me that the child/parent is serious, and willing to invest in their professional career. Headshots don’t have to cost a fortune, and if a child is on the younger side, good digital pictures are fine. Make sure the photos are clear and UPDATED!
3. Contact agencies and ask for days they conduct open calls. This is a great was to get in front of an agent. Be sure to have your child in an on-going acting class. On-going education is also key in this industry. If one agency turns you down or you don’t hear back, don’t give up. It’s all about being aggressive and persistent.
4. Talk to everyone you know. We do meet a lot of kids through referrals, and someone you know might be involved in the business or know someone who is. Just like looking for a job, finding an agent is about networking!
While some girls and guys dream of being a fashion model from the very first time they pick up a fashion magazine or see America’s Next Top Model, the harsh reality is that this is an occupation and, and like any job, there are VERY SPECIFIC REQUIREMENTS. Unfortunately, unlike a lawyer or even a actor, some of the requirements cannot be learned, purchased, or faked. I’m not writing this to be negative or to break hopes and dreams. Agency Requirements are driven by clients who book fashion models. These requirements are not completely based on customers being more likely to buy clothing from models who fit a certain size range or look. Models have to fit into the sample sizes from the client.
Here are the Minimum Requirements Height requirements for submission to modeling agencies:
FOR GIRLS: 5’9 to 6’ ft.
FOR BOYS: 6’ to 6’3 ft.
This is the most likely the most frustrating requirement for most aspiring models to deal with because you can’t change your height. Working in this industry for over 10 years, I would suggest if you have a face of an angel and an amazing look. You should look in to acting. If you are dedicated and get the proper training…you could have an amazing career and make some really good money. Best of luck on your journey!
For brands and businesses with products to promote, the quality of their photographs is key to a successful promotional campaign. Cameras have a way of underexposing images particularly when they are placed on a light or white background. The best way to achieve clear and vivid images is to utilize your manual exposure settings and adjust your shutter speed.
There are photography methods that professionals use to capture products in the clearest way possible. If a potential customer or client views a brand’s product page and the items are dark or fuzzy, it gives the appearance of a less than professional service or mediocre product line.
By following the tips below, you can create product photography that stands out above your competition.
Know How to Focus Your Camera
Before beginning to take product photos, make sure you know how your camera works. Before beginning to take any photos, become familiar with all of your camera’s settings and learn how to focus your camera. It is a waste of precious time to take unappealing photos that appear amateurish that you will have to spend time editing.
When Taking Close Ups Use the Aperture Priority Mode
When taking product photos you will want the largest area of your product in the camera’s focus. Set your camera’s aperture priority mode to its highest setting. When you are capturing close ups of your products, the aperture mode setting becomes highly important when it comes to taking a clear, quality photograph.
Utilize Your Tripod
One of the most important things to remember when taking product photos is the use of a tripod. A tripod holds your subject perfectly still so that the camera can capture a true representation of the product. Without a tripod, any slight movement of an object will result in a less than stellar photo.
Use Your Camera’s Flash Sparingly and Use Natural Lighting As Much As Possible
Your camera’s flash will rarely give you the type of lighting you need when taking close up product photos. For most product photos, the use of natural lighting will result in a clearer, more detailed picture. When possible take photos outdoors in natural light. Overcast days are perfect for taking product photos. If taking your pictures outside is not doable, get yourself a photo tent for indoors. A photo tent is the next best thing to capturing a product in natural lighting.
Edit Your Photos with Software
Technology has provided us with many ways to create the perfect photograph. Once your product photos are taken, use editing software to make your photos clear and professional looking. There is plenty of photo editing software online that will offer you the choice of various tints, backgrounds, and special effects, to make your product photos look like art.
The eyes are a very captivating part of any portrait. When onlookers see that they are looking at something, they will be curious as to what it is. So how does where they are looking impact the picture?
Where they are looking in the photo can make a difference as to how it’s viewed or received.
Here are a few examples of this:
If a child is looking at a plate of cookies, the viewer may be pulled into a sense of longing, and the cookies would ultimately become the focus of anyone who saw it.
If you saw two people looking at each other, you would get the sense that they were in a relationship or that they were close with one another.
If you saw there was only one person in the photo, and they were looking away from the camera, then the onlookers might want to know what it is they are looking at.
Looking Away From the Camera
You can either choose to have an object in the shot that the subject is looking at, or you can choose to leave that off screen. Both of these options will give a different emotional meaning, so consider this when creating the shot.
Also, if you chose to have an object within the shot, it will most likely become the focus of the shot. If you’re looking to highlight the person, then you might want to leave the other objects out.
Looking At the Camera
When your subject is looking straight at the camera, there isn’t really a choice but to focus on them!
Be aware that having such a direct gaze can be somewhat strong and has the ability to create tension. This isn’t necessarily a bad thing, but something to keep in mind when creating the shot.
Take a moment before posing to consider where the subject is looking, and what sort of effect this might have on the shot.
An acting career is challenging, no matter how you look at it; and there are certain tips and techniques that aspiring actors should know, to make the road to success a bit smoother. Too many actors fail in the area of having a professional looking portfolio. They rely on basic family photos and selfies to do the trick. But when you are in front of a reputable agent, you will need to have headshots that are polished and refined. But how do you know where to go, or how to prepare?
First things first, find a professional headshot photographer. Ask people in the business for suggestions and then check the photographer’s references. After you find the right photographer, follow these highly effective suggestions to take your best headshot pictures.
1. Don’t overdress or wear too much makeup
A great headshot should look like you, not your doppelganger. Agents needs to see what you really look like in a natural setting. Of course, you don’t want to roll out of bed and head to the photo studio, but you want to look as natural as possible.
2. Get plenty of rest and a full night’s sleep
The best way to look great naturally, is to be well rested. Make sure you get plenty of sleep the night before, and preferably, the week before. Partying before a photo shoot is never a good idea. But if you must, beware of consuming too many alcoholic beverages, as they dehydrate you, which can make your skin look dull, and leave you feeling tired.
3. Practice photo taking at home
Just as you do with all those selfies you post on Twitter; practice makes perfect. Stand in front of your mirror at home and practice your smile and facial expressions. It is best to know what works before you get to the photographer’s studio.
4. Let the photographer know what kind of photos you need
Communicate clearly with your photographer and let him/her know exactly what you need and how you are intending to use the photos. A professional will then be able to guide you as to the best poses, backgrounds, lighting, etc.
5. The color black is often the best option
Dress simply and comfortably for your photos. You will want to avoid clothing that you will have to fuss with, like drooping shirt straps, ill-fitting bras, or clothing too small or excessively tight. Avoid wearing white, unless you have a colorful tank top or camisole underneath. A white shirt can drown you out in a photo. Black is usually the best option. A black dress shirt, dress, or jumpsuit, makes your face, eyes, and skin coloring, stand out.
And most importantly, go into the photo shoot with a great attitude. If you are feeling ill, disappointed, angry at someone, or just plain old “out of it”, it is best to reschedule your appointment.
Whether its getting your picture taken professionally or just choosing a picture for your LinkedIn, there are a lot of ways that a picture could go wrong and give potential employers the wrong idea.
Here are some ways that your epic-headshots can turn into an epic-failure:
Blurry Pictures: No matter what the situation, it just spells amateur.
Bad Lighting: Shadows may do well to make some people look mysterious… but this is neither the time nor the place.
Tacky Backgrounds: Hellooooooooooo 1980’s!
Odd Things Taking Place in the Background: …is that seriously someone doing a shot in the background?
Anything That Resembles Facebook Trends: This includes cropping out your friend, holding your chi-poo, or your baby. Some other no-no’s include: messy backgrounds, significant others, and selfies.
The “I’m Clearly Drunk” Photo: No further explanation needed.
The Action Shot: That picture of you conquering an oversized rock isn’t going to speak well for your risk-taking.
The Cubicle Action Shot: We all have phones in our cubicles; so unfortunately working the landline isn’t bound to impress many people.
Iffy Black and White: As a disclaimer, it should be said that these can work well for you- if done right. But if you’re using your 1-megapixel camera from 2004, then you probably won’t get it to come out the way you saw it in your mind.
The Dwight Schrute Look: You’re allowed to smile in business pictures and relax! Don’t be such a stiff that you tell everyone in one look that you’re that guy that no one wants to talk to!
I’m Kind of a Big Deal: Keep the events and talks for your resume- it can rub people the wrong way when they see that podium (made of rich mahogany) in the picture.
Group Pictures: This is definitely out as a headshot option, but people should know who they are looking for when they see your LinedIn, as well.
The Over-Glamour Shot: Yes, you want to look nice- no doubt! But you certainly have the ability to over do it, as well.
Even if you don’t have a professional headshot yet, these lifesaving tips will help you help you get ahead in the business world with just a glance!
 This week, Khloe Kardashian (I’m her biggest fan, by the way) fought back against the swarms of angry people calling her out for retouching her recent Complex cover shoot. In the side-by-side photos, you can see how the shadows and lighting have been lightly edited.
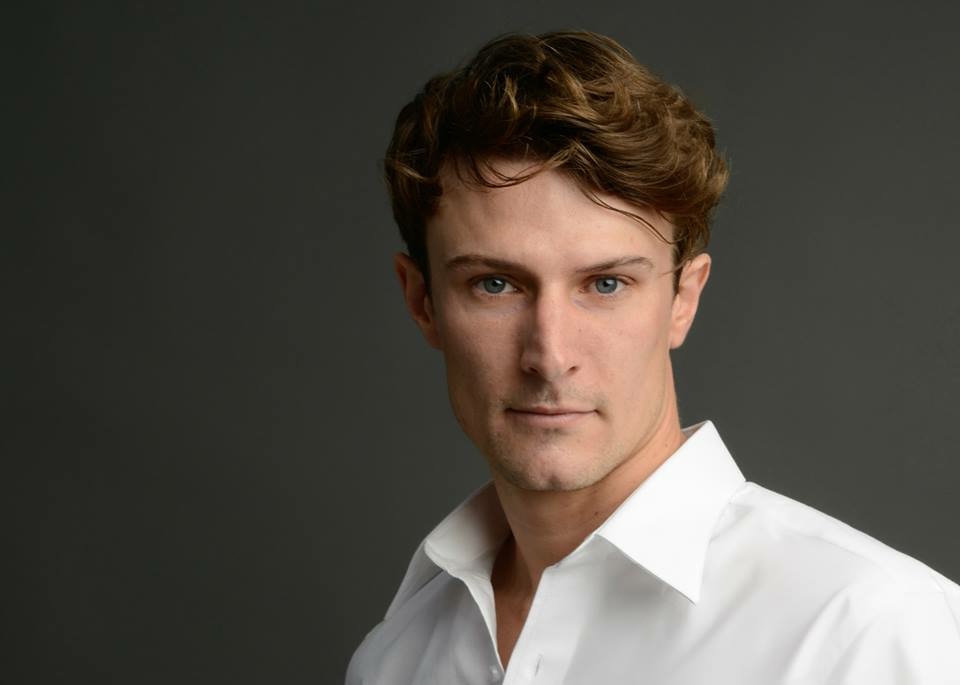


Subscribe to Beau’s Blog