Anyone who knows me is well aware I’m obsessed with reality television – especially The Real Housewives. It’s not the most intellectual or deep programming, but it helps me tune out and relax. Nothing too heavy, just fun and games – and drama I can watch from the comfort of my own couch without participating in. So when I had the opportunity to shoot THE Cynthia Bailey and her new eyewear collection, I nearly had a fan freak out!
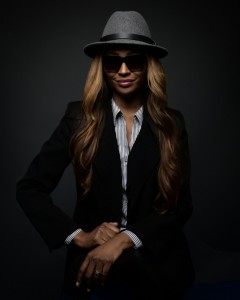
If you watch Real Housewives of Atlanta, anything on Bravo TV, or follow social media, you’ve heard of Cynthia’s eyewear collection and the “‘mercial.” (Side note: can anyone confirm who came up with the word “’mercial?”) But you may not have seen the actual glasses – they’re stunning. Her styles are fun, fresh and youthful – just like Cynthia.
Cynthia’s eyewear collection combines a modern, sleek sophisticated vibe. She’s taken many frames and lenses that blend a New York fashion scene with the cool, calm feel of Atlanta. It’s a perfect representation of her own personality. My personal favorite is the “Noelle Black” frame with the lightly purple-tinted lenses. Stay tuned for more frames as they become available.
If you’re addicted to Bravo like I am, be sure to watch #ShadySunday – the first episode of the Real Housewives of Atlanta Reunion airs tonight!


 not, clients will come in to my studio and try to do their hair and make-up on their own. Sure, your normal ‘do looks great for your day-to-day activities but may not be a great choice for photos. The subtle details of your face get picked up in a big way on camera and everything is magnified.
Subscribe to Beau’s Blog